With so many cameras or smartphones these days featuring a built-in flashgun you might ask yourself why you would ever need anything else. If you’re happy to simply achieve snaps on the go, with a little extra illumination for when the light starts to fade then it’s true that the burst of light an on-camera flash can supply might do the job. However, you’ll be very limited in terms of what else you might be able to do and you’re obviously stuck with the position of the flash and how far away from your subject you can be.
Invest in a bigger, better and more powerful flashgun, however, and suddenly you’ve opened the door to a whole host of creative possibilities. Many experts claim that a flashgun is the single most important accessory you can buy, providing ‘lightning in a bottle’ that can enable you to freeze action, mimic studio lighting and balance harsh natural lighting. For good measure you can also use its output to create some weird and wonderful creative effects, but to get the best from your ‘gun’ you need to think out of the box a little and be prepared to approach the whole concept of flash lighting from a fresh angle.

Which Flashgun?
If you’re going to invest in a separate flashgun you need to be aware that they come in all shapes and sizes and aren’t all designed to do exactly the same job. A compact and budget-friendly version such as the Kenro Mini Speedflash, for example, is tiny enough to go anywhere and can happily sit in your camera’s hot shoe or off-camera and provide copious amounts of flash. Despite its keen price this particular product also boasts advanced features such as full ETTL, which enables compatible cameras to determine flash exposure, while it also has a bounce and swivel head, which allows the direction of the flash to be changed, crucial for the bounced flash technique we’ll cover later.
Larger flashguns with more features, such as Kenro’s Standard Speedflash, throw out even more light and boost your options still further. Here you’ll find a fast recycle time and even a zoom flash facility, so that the light can be thrown a greater distance, and the gun can act as a master unit, firing others located away from the camera, or be used as a slave unit itself. The head swivels and can be angled up or down, there’s a built in reflection card and wide angle diffuser and a whole host of modes that can be set to achieve precisely the lighting effect you’re looking for.
Techniques
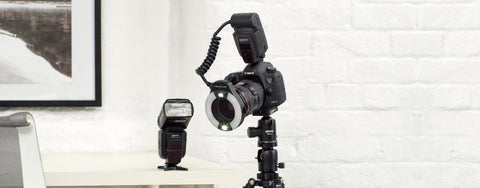
The first thing to realise is that you don’t need to use a flashgun in a traditional way, i.e. mounted in a hot shoe directly over the camera lens. In many ways that’s a bad place to have it in any case, since the lighting will be direct and unflattering, there could be harsh shadows and you’ll probably end up with a bad case of red eye. A much better idea is to have the flashgun off-camera, to one side or the other, perhaps on a bracket or a separate tripod/lighting stand, and you could soften the effect by placing a flash diffuser between the flash and your subject.
- Off-camera flash. If you’ve got a wireless flashgun you can pretty much position it where you want, but you can still liberate a non-wireless flash from your camera by using a long synch cord and a hot shoe adapter. You don’t need to go far: a metre or so either side of the camera would make a big difference, and throw the shadows somewhere where you won’t be able to see them.
- Bounce flash. Another way to soften the light reaching your subject is to bounce it off the wall or ceiling behind you. If a flashgun features a swivelling head that can be angled this is a big bonus because it makes this technique easy. Aim for the point between wall and ceiling and work with a wall that’s a neutral colour, otherwise the light itself will take on a hue. By bouncing the light some of the intensity will go out of it, and what’s left will be beautifully soft. It will have lost power, however, and so you’ll need to add a couple of stops on to the estimated exposure to get the right result.
- Fill-in flash (beach pictures). Sometimes you can use flash in such a way that your viewer will never know that it’s been used at all. This can be particularly useful if you’re shooting towards the light and your subject’s face would otherwise be in deep shadow. If you dial down the output on your flashgun you can fire a burst of subdued light into the scene and effectively lower the contract. The light coming from behind and that hitting the face should now be balanced and you could also get the benefit of backlighting on the hair to add to the atmosphere.
- Full on, fill in. (Cave pictures) If you take a direct flash shot of people in front of a dark scene then the result can appear very artificial, but if you have a bright subject behind them, such as the opening to a cave or the end pf a tunnel, then you end up with a balanced scene. In a case such as this, where there is very little front light, you will usually have to work with the flash on full power, but the exposure should then match that for the bright area behind.
- Flash and daylight (train picture). It can be very effective to work with flash at the twilight hour, when there is still some light in the sky. While the result will certainly look contrived, it’s an interesting effect, and one that you can play around with. The fact that it’s only possible to work in this way for a very limited time each day adds to the attraction.
- Coloured gels. Pop one of these on a flashgun and the light you create will be coloured. If you visit a very dark scene, say an abandoned building at night, you could sit your camera on a sturdy tripod, open the shutter and then walk around the scene, filling in points with coloured light. Or you could use straight white flashlight and then ‘paint’ that same scene in by walking around and firing your flash at regular intervals. The trick is not to get yourself into the shot, but with practice the results can be amazing and super ethereal.
- Multiple flashguns. The emergence of wireless technology is opening the door to the straightforward use of multiple flashguns, and this gives you yet more opportunity to get creative with your flash set up. A good portrait set up, for example, could be a key light on one side from 45-degrees, a less powerful light from the other side, also at 45-degrees, and a third light low down on the floor behind the subject and angled upwards to provide a back-light. The possibilities are endless and it’s up to the individual to experiment: you can have several ‘slaves’ in a wireless TTL system, giving you the freedom to play around with the final look to your heart’s content.
Invest in a decent, powerful and adaptable flashgun and you won’t regret it. This valuable accessory could be your open door to some great new photographic techniques.